StarRocks and Apache Polaris Integration: Building a Unified, High-Performance Data Lakehouse
Introduction: Why StarRocks + Apache Polaris?🔗
Modern Data-Architecture Pain Points: Silos & Engine Lock-in🔗
Today’s data-driven enterprises face two chronic ailments:
Data silos : transactional data sits in RDBMS, click-streams in an S3 data lake, CRM data in a SaaS vault, etc. Cross-domain analysis requires expensive ETL and still arrives stale.
Engine lock-in : every OLAP engine optimises for its own metadata layer and file layout. Migrating to a faster or cheaper engine means re-formatting, re-writing and re-governing years of data.
An open, interoperable architecture is no longer a luxury, it is a survival requirement.
StarRocks at a Glance: Speed & Simplicity🔗
StarRocks is a modern MPP database designed for high-performance analytics and real-time data processing. Key features include:
MPP, fully-vectorised execution, CBO that thrives on complex multi-table joins.
Sub-second response on TB-scale data without pre-aggregation.
Compute-storage separation since v3.0: scale stateless compute pods in seconds, keep data in cheap object storage.
Apache Polaris (Incubating): Vendor-Neutral Iceberg Catalog🔗
100% open-source implementation of the Iceberg REST Catalog API.
Pluggable metadata backend (PostgreSQL, in-mem) and multi-cloud storage support.
Fine-grained RBAC + credential-vending (temporary STS tokens) for secure, governed sharing across engines.
Technical benefits🔗
Keep ONE copy of data in Iceberg on S3, queryable by Spark, Flink, Trino, and StarRocks concurrently.
Maintain ONE set of role-based permissions in Polaris that apply to every engine.
Utilize StarRocks to deliver BI dashboards, conduct ad-hoc exploration, and perform lightweight ETL operations on the same up-to-date dataset, zero data movement and zero vendor lock-in.
Architecture🔗
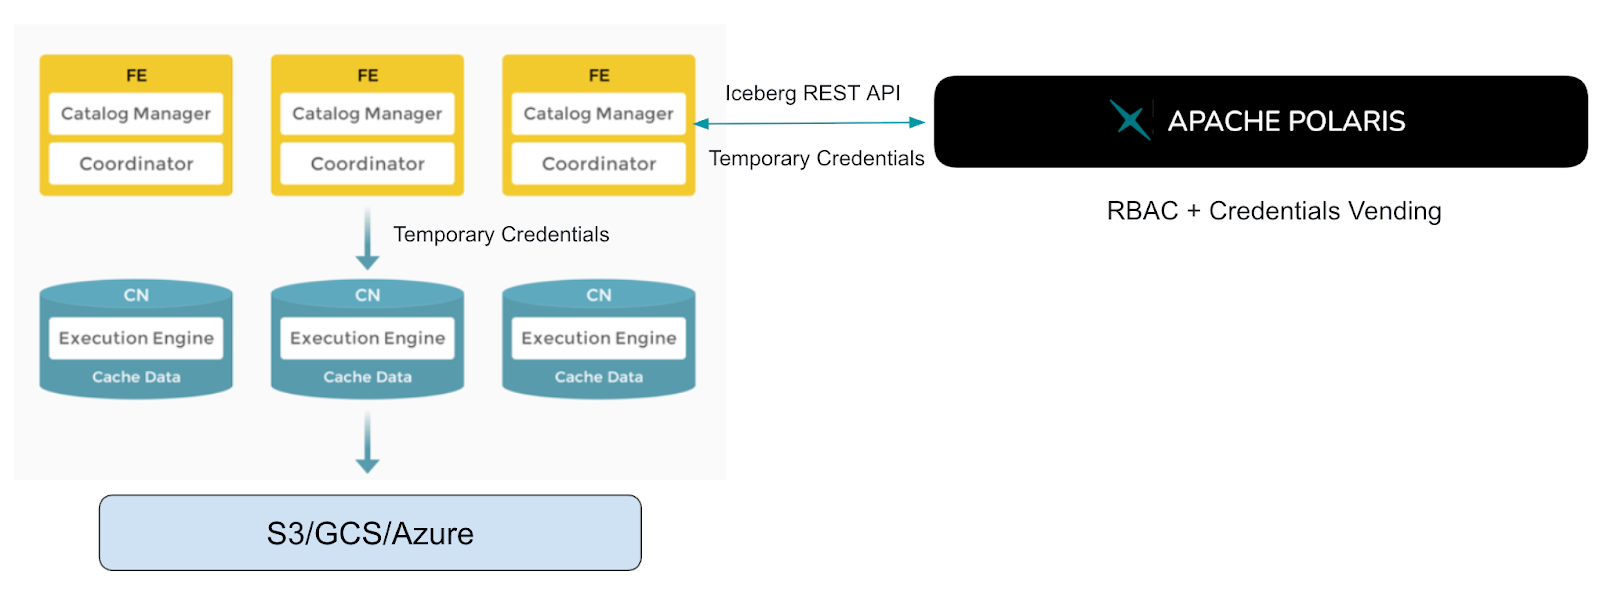
Polaris acts as the single source of truth for:
Table schema, partitions, snapshots
Role-based access control (RBAC)
Short-lived, scoped cloud credentials (credential vending)
StarRocks acts as a stateless compute layer:
Discover Iceberg metadata via REST calls
Directly reads Parquet/ORC files from cloud storage using the vendored credentials
Applies its own CBO and vectorised execution for query acceleration
Deploy and Configure Polaris🔗
User can refer to Polaris Quickstart to deploy Polaris, Here we will compile from source code and deploy Polaris via a standalone process.
Clone Source Code and Start Polaris🔗
- Clone source code and checkout to released version
User can get the latest released version from https://github.com/apache/polaris/releases
1# download the latest released version 1.1.0-incubating
2wget https://dlcdn.apache.org/incubator/polaris/1.1.0-incubating/apache-polaris-1.1.0-incubating.tar.gz
3tar -xvzf apache-polaris-1.1.0-incubating.tar.gz
4cd apache-polaris-1.1.0-incubating
- Build Polaris
1./gradlew \
2  :polaris-server:assemble \
3  :polaris-server:quarkusAppPartsBuild --rerun \
4  :polaris-admin:assemble \
5  :polaris-admin:quarkusAppPartsBuild --rerun
- Run Polaris
Ensure you have Java 21+, and export aws access key and secret key first.
1export AWS_ACCESS_KEY_ID=<access_key>
2export AWS_SECRET_ACCESS_KEY=<secret_key>
3
4./gradlew run
When Polaris is run using the./gradlew run command, the root principal credentials are root and s3cr3t for the CLIENT_ID and CLIENT_SECRET, respectively.
When using a Gradle-launched Polaris instance, it’ll launch an instance of Polaris that stores entities only in-memory. This means that any entities that you define will be destroyed when Polaris is shut down.
We suggest that users refer to this section (https://polaris.apache.org/releases/1.1.0/metastores/) to configure the metastore to persist Polaris entities.
1export POLARIS_PERSISTENCE_TYPE=relational-jdbc
2export QUARKUS_DATASOURCE_USERNAME=<your-username>
3export QUARKUS_DATASOURCE_PASSWORD=<your-password>
4export QUARKUS_DATASOURCE_JDBC_URL=<jdbc-url-of-postgres>
5
6export AWS_ACCESS_KEY_ID=<access_key>
7export AWS_SECRET_ACCESS_KEY=<secret_key>
8
9./gradlew run
Using Admin Tool (https://polaris.apache.org/releases/1.1.0/admin-tool/) to bootstrap realms and create the necessary principal credentials for the Polaris server.
For example, to bootstrap the POLARIS realm and create its root principal credential with the client ID root and client secret root_secret, you can run the following command:
1java -jar runtime/admin/build/quarkus-app/quarkus-run.jar bootstrap -r POLARIS -c POLARIS,root,root_secret
Creating a Principal and Assigning it Privileges🔗
Use the Polaris CLI (already built in the same folder):
- Export CLIENT_ID and CLIENT_SECRET
1export CLIENT_ID=root
2export CLIENT_SECRET=root_secret
- Create catalog
1./polaris
2  --client-id ${CLIENT_ID} \
3  --client-secret ${CLIENT_SECRET} \
4  catalogs create \
5  --storage-type s3 \
6  --default-base-location ${DEFAULT_BASE_LOCATION} \
7  --role-arn ${ROLE_ARN} \
8  polaris_catalog
The DEFAULT_BASE_LOCATION you provide will be the default location that objects in this catalog should be stored in, and the ROLE_ARN you provide should be a Role ARN with access to read and write data in that location. These credentials will be provided to engines reading data from the catalog once they have authenticated with Polaris using credentials that have access to those resources.
- Creating a Principal and Assigning it Privileges
Use below commands to create principal, principal role and catalog role
 1./polaris \
 2  --client-id ${CLIENT_ID} \
 3  --client-secret ${CLIENT_SECRET} \
 4  principals \
 5  create \
 6  jack
 7
 8./polaris \
 9  --client-id ${CLIENT_ID} \
10  --client-secret ${CLIENT_SECRET} \
11  principal-roles \
12  create \
13  test_user_role
14
15./polaris \
16  --client-id ${CLIENT_ID} \
17  --client-secret ${CLIENT_SECRET} \
18  catalog-roles \
19  create \
20  --catalog polaris_catalog \
21  test_catalog_role
When the principals create commands successfully, it will return the credentials for this new principal,save it.
Use below command to grant privileges
 1./polaris \
 2  --client-id ${CLIENT_ID} \
 3  --client-secret ${CLIENT_SECRET} \
 4  principal-roles \
 5  grant \
 6  --principal jack \
 7  test_user_role
 8
 9./polaris \
10  --client-id ${CLIENT_ID} \
11  --client-secret ${CLIENT_SECRET} \
12  catalog-roles \
13  grant \
14  --catalog polaris_catalog \
15  --principal-role test_user_role \
16  test_catalog_role
17
18  ./polaris \
19  --client-id ${CLIENT_ID} \
20  --client-secret ${CLIENT_SECRET} \
21  privileges \
22  catalog \
23  grant \
24  --catalog polaris_catalog \
25  --catalog-role test_catalog_role \
26  CATALOG_MANAGE_CONTENT
We grant CATALOG_MANAGE_CONTENT privilege to the catalog role test_catalog_role, and assign the principal role test_user_role to principal jack, then assign the catalog role test_catalog_role to principal role test_user_role.
Configure StarRocks Iceberg Catalog🔗
First, you need to have a StarRocks cluster up and running. Please refer to the StarRocks Quick Start Guide for instructions on setting up a StarRocks cluster. Then you can create an external Iceberg catalog in StarRocks that connects to Polaris.
Create External Catalog🔗
- Use credentials vending
It’s recommended to use Polaris’s credential vending feature to enhance security by avoiding long-lived static credentials.
Here is an example of creating an external catalog in StarRocks that connects to Polaris using credential vending:
 1CREATE EXTERNAL CATALOG polaris_catalog
 2PROPERTIES (
 3    "iceberg.catalog.uri"  = "http://<POLARIS_HOST>:<POLARIS_PORT>/api/catalog",
 4    "type"  =  "iceberg",
 5    "iceberg.catalog.type"  =  "rest",
 6    "iceberg.catalog.warehouse" = "polaris_catalog",
 7    "iceberg.catalog.security" = "oauth2",
 8    "iceberg.catalog.oauth2.credential" = "<jack_client_id>:<jack_client_secret>",
 9    "iceberg.catalog.oauth2.scope"='PRINCIPAL_ROLE:ALL',
10    "aws.s3.region" = "us-west-2",
11    "iceberg.catalog.vended-credentials-enabled" = "true"
12 );
We use jack’s credential(client_id and client_secret) created above to access polaris_catalog.
Users will have the permissions of user jack when accessing Iceberg tables in polaris_catalog.
- Use S3 storage credentials
If you prefer to use static S3 credentials instead of credential vending, you can create the external catalog in StarRocks as follows:
 1CREATE EXTERNAL CATALOG polaris_catalog
 2PROPERTIES (
 3    "iceberg.catalog.uri"  = "http://<POLARIS_HOST>:<POLARIS_PORT>/api/catalog",
 4    "type"  =  "iceberg",
 5    "iceberg.catalog.type"  =  "rest",
 6    "iceberg.catalog.warehouse" = "polaris_catalog",
 7    "iceberg.catalog.security" = "oauth2",
 8    "iceberg.catalog.oauth2.credential" = "<jack_client_id>:<jack_client_secret>",
 9    "iceberg.catalog.oauth2.scope"='PRINCIPAL_ROLE:ALL',
10    "aws.s3.region" = "us-west-2",
11    "aws.s3.access_key" = "<access_key>",
12    "aws.s3.secret_key" = "<secret_key>",
13    "iceberg.catalog.vended-credentials-enabled" = "false"
14 );
Manage iceberg tables through StarRocks🔗
Connect to StarRocks and run the following commands to create and query an Iceberg table through the Polaris catalog:
 1-- switch to external iceberg catalog
 2StarRocks>set catalog polaris_catalog;
 3Query OK, 0 rows affected (0.00 sec)
 4
 5-- create database
 6StarRocks>create database polaris_db;
 7Query OK, 0 rows affected (0.06 sec)
 8
 9StarRocks>use polaris_db;
10Database changed
11
12-- create iceberg table taxis
13StarRocks>CREATE TABLE taxis
14    -> (
15    ->   trip_id bigint,
16    ->   trip_distance float,
17    ->   fare_amount double,
18    ->   store_and_fwd_flag string,
19    ->   vendor_id bigint
20    -> )
21    -> PARTITION BY (vendor_id);
22Query OK, 0 rows affected
23
24-- insert data
25StarRocks>INSERT INTO taxis
26    -> VALUES (1000371, 1.8, 15.32, 'N', 1), (1000372, 2.5, 22.15, 'N', 2), (1000373, 0.9, 9.01, 'N', 2), (1000374, 8.4, 42.13, 'Y', 1);
27Query OK, 4 rows affected
28
29-- query iceberg table
30StarRocks>select * from taxis;
31+---------+---------------+-------------+--------------------+-----------+
32| trip_id | trip_distance | fare_amount | store_and_fwd_flag | vendor_id |
33+---------+---------------+-------------+--------------------+-----------+
34| 1000372 |           2.5 |       22.15 | N                  |         2 |
35| 1000373 |           0.9 |        9.01 | N                  |         2 |
36| 1000371 |           1.8 |       15.32 | N                  |         1 |
37| 1000374 |           8.4 |       42.13 | Y                  |         1 |
38+---------+---------------+-------------+--------------------+-----------+
394 rows in set
For more information about using Iceberg table with StarRocks, please refer to:
https://docs.starrocks.io/docs/data_source/catalog/iceberg/iceberg_catalog